FHB Logo Facebook LinkedIn Email Pinterest Twitter X Instagram Tiktok YouTube Plus Icon Close Icon Navigation Search Icon Navigation Search Icon Arrow Down Icon Video Guide Icon Article Guide Icon Modal Close Icon Guide Search Icon Skip to content
Subscribe
Log In
  • How-To
  • Design
  • Tools & Materials
  • Restoration
  • Videos
  • Blogs
  • Forum
  • Magazine
  • Members
  • FHB House
  • Podcast
Log In

Fine Homebuilding Project Guides

Plumbing

Guide Home
  • Plumbing Basics
  • Bathrooms
  • Kitchens
  • Roughing In
  • Water Heaters, Washers, and More
  • Maintenance and Repair
How-To

Installing an Under-Sink Water Filter

Follow these basic steps to add a dedicated drinking-water faucet to your kitchen sink.

By Steve Cory

An under-sink water filter can be attached to the cold-water supply of the main faucet, but in that case, it would filter all the cold water you use for cleaning as well as drinking, which would require you to change the filter more frequently. Here, we show how to install a filter with its own dedicated drinking-water faucet.


Under-Sink Water Filters

The steps shown below show installing a simple single-stage filtration and absorption system, which will filter out most particles. It has a single small filter that takes up little space and needs to be replaced only twice a year or so. Two- and three-stage filters have, unsurprisingly, two or three canisters. Some filter systems add a tank as well. Here are some common filter options:

Under-Sink Water Filters

  • Activated carbon (sometimes called charcoal) filters are inexpensive. They will remove most particles and much of the chlorine, but cannot remove heavy metals like lead and copper and won’t improve acidic water from wells. Over time, as particles collect, water pressure through the faucet will lessen as particles collect and clog.
  • KDF (kinetic degradation fluxion) filters cost more, but do a better job of removing (actually, converting) chlorine and will effectively filter out heavy metals. They also kill microorganisms that are often missed by an activated carbon filter.
  • An ion exchange filter is typically a canister (it may be one of the stages of a two- or three-stage filter system) containing tiny resin beads that “deionize” water, to remove nearly all inorganic particles. When used along with an activated carbon or KDF filter, pretty much all inorganic matter, parasites (including giardia), and chlorine will be removed.
  • If you have serious water problems, the most common solution is a reverse-osmosis filter (see photo). These typically have two or three canisters plus a tank, and so take up a good deal of under-sink space. In addition to the filtering power of KDF filters, a reverse-osmosis filter removes radioactive contamination, which is a problem in many areas, and turns hard water into soft, drinkable water.


The faucet will require a hole in the sink’s deck. The sink shown here came with four holes, so one was available. Some porcelain or fireclay sinks (like the one shown here) have knockouts, which you tap with a hammer and cold chisel to produce a hole. If none of these options are available, you may need to drill a new hole in the sink or countertop.

The water path is easy to follow: It runs from the cold-water pipe to the filter, and then to the faucet.


MOUNT THE FAUCET
1. MOUNT THE FAUCET. Mount the faucet through the sink with the hardware provided. Position the rubber gasket on the bottom of the faucet’s body so it seals against the top of the sink. To be sure of the seal, set the faucet in a bed of clear silicone caulk. Here, there is a U-shaped washer and a long nut. If you cannot reach the nut with a wrench, use a basin wrench instead.


ATTACH THE BRACKET WITH FILTER
2. ATTACH THE BRACKET WITH FILTER. Screw the filter canister onto the mounting bracket. Mound the bracket at a place convenient for running the supply tubes. The filter may shake a tiny bit, so make sure it does not touch any pipes.


CONNECT TO THE FILTER
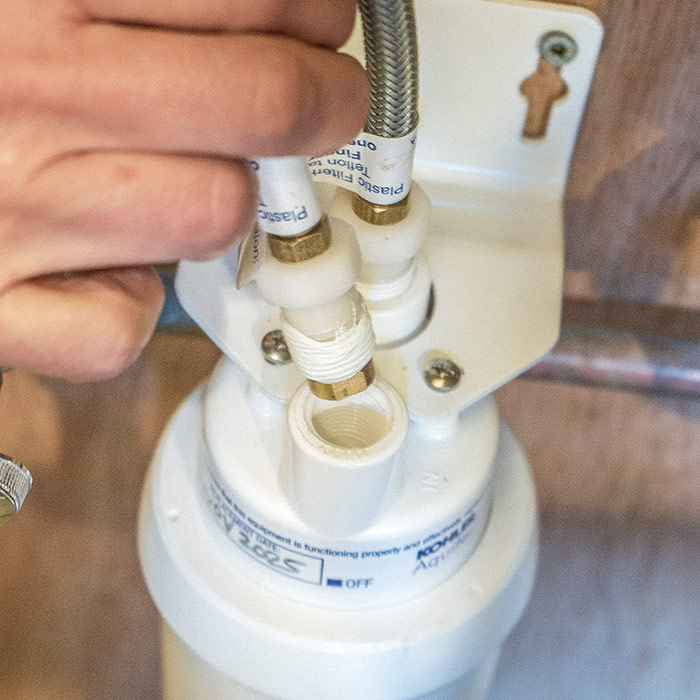
3. CONNECT TO THE FILTER. Connect the supply tube that comes from the filter to the port labeled OUT. (There may be arrows or other indications showing the direction of water flow.) Connect the other supply tube to the IN port. These supply tubes have plastic threads; wrap them with three windings of plumbing (Teflon) tape before screwing them in.


CONNECT TO THE WATER SUPPLY
4. CONNECT TO THE WATER SUPPLY. Attach the other end of the tube leading to the IN port to the cold-water supply. If the filter doesn’t come with a T fitting on the supply line, you will have to add one to your existing sink cold-water supply valve.


Excerpted from Plumbing (The Taunton Press, 2016) by Steve Cory.

Sign up for eletters today and get the latest how-to from Fine Homebuilding, plus special offers.

Signing you up...

This site is protected by reCAPTCHA and the Google Privacy Policy and Terms of Service apply.
See all newsletters
See all newsletters
Previous: Drinking-Water Filtration Systems Next: Connecting an Ice Maker

Guide

Plumbing

Chapter

Kitchens

Log in or create an account to post a comment.

Sign up Log in

Become a member and get full access to FineHomebuilding.com

Plumbing

Plumbing

Trusted, comprehensive guidance from the pros for tackling any plumbing project

View Project Guide

View All Project Guides »

Become a member and get unlimited site access, including the Plumbing Project Guide.

Start Free Trial

Plumbing Basics
  • Plumbing Systems
  • Materials
  • Plumbing Tools
Bathrooms
  • Sinks
  • Showers & Tubs
  • Toilets
Kitchens
  • Kitchen Sinks
  • Water Filtration
  • Appliances
Roughing In
  • Layout
  • Installation
  • Copper Pipe
  • PEX Tubing
  • PVC Drainpipe
Water Heaters, Washers, and More
  • Water Heaters
  • Whole-House Filters
  • Sump Pumps
  • Washers
  • Sprinkler Systems
Maintenance and Repair
  • Sinks
  • Toilets
  • Showers & Tubs
  • Systems

Fine Home Building

Newsletter Sign-up

  • Fine Homebuilding

    Home building tips, offers, and expert advice in your inbox.

  • Green Building Advisor

    Building science and energy efficiency advice, plus special offers, in your inbox.

  • Old House Journal

    Repair, renovation, and restoration tips, plus special offers, in your inbox.

Signing you up...

This site is protected by reCAPTCHA and the Google Privacy Policy and Terms of Service apply.
See all newsletters

Follow

  • Fine Homebuilding

    Dig into cutting-edge approaches and decades of proven solutions with total access to our experts and tradespeople.

    Start Free Trial Now
    • Facebook
    • Instagram
    • X
    • LinkedIn
  • GBA Prime

    Get instant access to the latest developments in green building, research, and reports from the field.

    Start Free Trial Now
    • Facebook
    • YouTube
  • Old House Journal

    Learn how to restore, repair, update, and decorate your home.

    Subscribe Now
    • Facebook
    • Instagram
    • X

Membership & Magazine

  • Online Archive
  • Start Free Trial
  • Magazine Subscription
  • Magazine Renewal
  • Gift a Subscription
  • Customer Support
  • Privacy Preferences
  • About
  • Contact
  • Advertise
  • Careers
  • Terms of Use
  • Site Map
  • Do not sell or share my information
  • Privacy Policy
  • Accessibility
  • California Privacy Rights

© 2025 Active Interest Media. All rights reserved.

Fine Homebuilding receives a commission for items purchased through links on this site, including Amazon Associates and other affiliate advertising programs.

X
X
This is a dialog window which overlays the main content of the page. The modal window is a 'site map' of the most critical areas of the site. Pressing the Escape (ESC) button will close the modal and bring you back to where you were on the page.

Main Menu

  • How-To
  • Design
  • Tools & Materials
  • Video
  • Blogs
  • Forum
  • Project Guides
  • Reader Projects
  • Magazine
  • Members
  • FHB House

Podcasts

  • FHB Podcast
  • ProTalk

Webinars

  • Upcoming and On-Demand

Podcasts

  • FHB Podcast
  • ProTalk

Webinars

  • Upcoming and On-Demand

Popular Topics

  • Kitchens
  • Business
  • Bedrooms
  • Roofs
  • Architecture and Design
  • Green Building
  • Decks
  • Framing
  • Safety
  • Remodeling
  • Bathrooms
  • Windows
  • Tilework
  • Ceilings
  • HVAC

Magazine

  • Current Issue
  • Past Issues
  • Magazine Index
  • Subscribe
  • Online Archive
  • Author Guidelines

All Access

  • Member Home
  • Start Free Trial
  • Gift Membership

Online Learning

  • Courses
  • Project Guides
  • Reader Projects
  • Podcast

More

  • FHB Ambassadors
  • FHB House
  • Customer Support

Account

  • Log In
  • Join

Newsletter

Get home building tips, offers, and expert advice in your inbox

Signing you up...

This site is protected by reCAPTCHA and the Google Privacy Policy and Terms of Service apply.
See all newsletters
See all newsletters

Follow

  • X
  • YouTube
  • instagram
  • facebook
  • pinterest
  • Tiktok

Join All Access

Become a member and get instant access to thousands of videos, how-tos, tool reviews, and design features.

Start Your Free Trial

Subscribe

FHB Magazine

Start your subscription today and save up to 70%

Subscribe

We hope you’ve enjoyed your free articles. To keep reading, become a member today.

Get complete site access to expert advice, how-to videos, Code Check, and more, plus the print magazine.

Start your FREE trial

Already a member? Log in

OSZAR »