A Guide to Mitered Joints That Won’t Open
Use these tools and casing methods to create perfect mitered joints that won't separate over time.
Synopsis: Carpenter Brian Campbell lists seven techniques for achieving mitered joints that won’t open over time. With annotated illustrations, this guide discusses the type of blade to use and how to accurately set up the miter saw, considerations for back beveling and front beveling, best ways to fine-tune out-of-square corners, and more.
Maybe more than any other finish-carpentry detail, the casing on doors and windows shows the skill of the carpenter who did the work. Most casing patterns are designed to turn corners with tight, coplanar miters. When the mitered joints are tight, it shows that the carpenter is skillful and indicates a higher quality of construction throughout the house.
Even the tightest miters can open weeks or months after the trim is installed as the moisture content of the wood changes seasonally. It might seem an impossible task, but with the right tools, techniques, and casing styles, you can make mitered joints that stay tight forever. I know because I’ve been a carpenter for three decades now, and I see which techniques work and which don’t. It might sound obvious, but a good first step is to glue your miters with wood glue. The end-grain glued joint is strong and has a lot of surface area so it keeps the miter from spreading. CA glue may dry quick, and a few drops make a great clamp, but the joint is brittle and doesn’t hold long-term. Here are some other ways I prevent opened miter joints for better-looking casing and fewer callbacks.
START WITH AN ACCURATE SAW
Miter saws need sharp, high-tooth-count blades and to be properly tuned to cut cleanly and accurately. Use a straight edge to check the rotating miter table is in plane with the nonmoving part of the saw table. Then use a straight edge to check that both sides of the fence are coplanar. Finally, make sure the miter pointer and bevel pointers read zero when the sawblade is perpendicular to the fence and saw table. You can learn how to adjust the fence and set the pointers with help from the owner’s manual, which can be found online if you’ve tossed it.


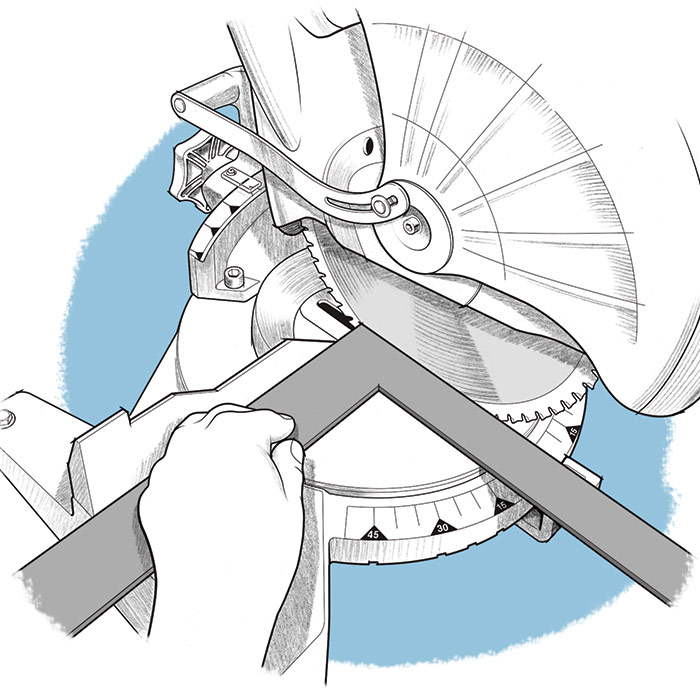

Test your saw’s setup by making a small picture frame with casing. Cut four equal-length pieces with 90° corners, and then arrange the pieces into a four-sided frame. Assuming the casing is not warped, a saw that’s properly tuned will cut the pieces so that they have tight, coplanar corners.
AND A SHARP BLADE
On my miter saws, I use negative hook angle ATB blades with 80 to 100 teeth. I prefer full-thickness blades over thin-kerf versions because they deflect less, resulting in more-accurate cuts, especially with hardwoods. With a slow feed rate, a sharp, high-quality blade on a well-tuned saw will produce glass-smooth cuts in hardwoods. It’s also important to have a decent stand that holds your saw securely and supports long stock.


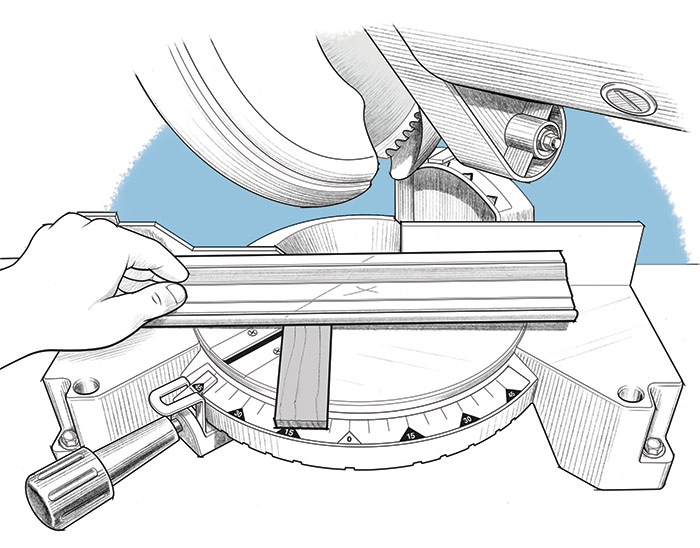
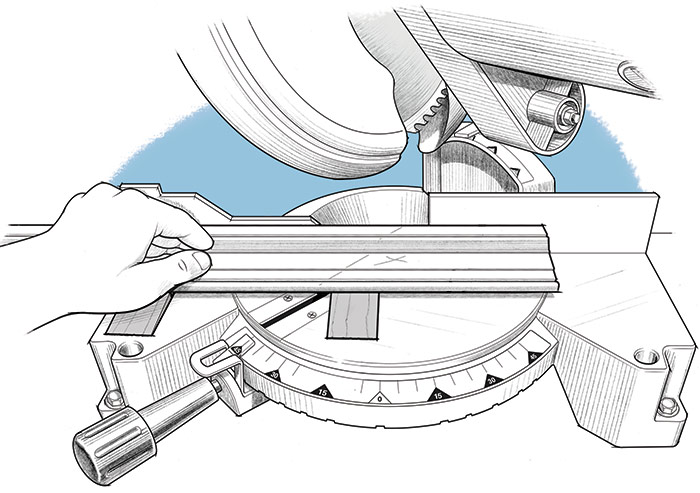
ASSUME CORNERS ARE OUT-OF-SQUARE
If I am casing doors or windows that I installed, I know the miters will be 45°, because when I install doors and windows I take the time and effort to make the head jamb and side jambs perpendicular, resulting in 90° corners where the head and side casing meet. If I’m trimming old work or trimming doors or windows someone else installed, I check the jamb corners with a Starrett Pro Site protractor. I like the Pro Site because it shows the bisecting angles for out-of-square corners.


The tool makes the task easier, because adjusting miters for out-of-square conditions is confusing. For example, an 88° corner is tighter than 90°, and the two-degree variance is best accommodated by adjusting the two pieces that meet at the miter by one degree each. However, the bisected 88° angle is not accomplished by cutting each miter at 44° on the miter saw, but at 46°, the complement of 44. This is because on a miter saw, a 90° cut, relative to the fence, reads 0° on the saw’s miter scale. If the budget doesn’t allow measuring and custom-cutting miters for every corner, you can often fine-tune miters with a low-angle block plane as the trim is installed, saving many trips to the saw.
BACK BEVEL WHEN IT MAKES SENSE
Cutting casing miters with a slight bevel, so there’s a small gap at the back of the joint, is called back beveling. Some carpenters back bevel miters as a routine practice, assuming it makes it easier to get tight miters at the face. I find that back beveling makes miters more likely to open up over time, because with the gap at the back the glue joint is weaker. I only back bevel if the conditions require it, like when jambs are proud of the wall.

If the budget allows and the jambs are solid stock, I plane them flush with the wall with a cordless planer. If planing isn’t possible, back beveling makes sense. I adjust the bevel setting with a shim near the blade, which lifts the casing, creating the back bevel. It’s faster than adjusting the bevel setting and recreates the out-of-plane condition.
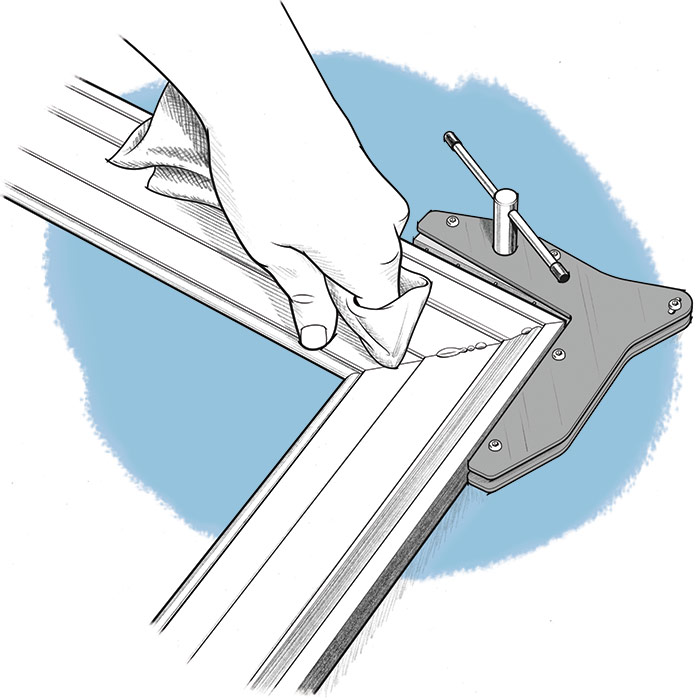
PREASSEMBLE CASING WHENEVER POSSIBLE
Gluing casing into a three-sided assembly before installation is my go-to strategy because it doesn’t take a lot of time, and by gluing the head casing to the sides the miters start out aligned and coplanar. Casing installed as separate pieces will follow any of the wall’s imperfections. How much time I spend preassembling casing varies with the project budget. For the lowest-budget jobs, I use wood glue and cross-pin the joint with a pin-nailer and let the glue firm up for as little as 15 minutes. On higher-end jobs I use Collins spring clamps or Clam Clamps and let the glue set up for 30 minutes or an hour. I often join wide casing, which is more likely to open up at mitered joints, with biscuits, dominoes, or pocket screws. The additional fastening helps hold the miter together and keep the head and sides coplanar.

FIX PROUD DRYWALL
THE BEATINGS— When a variance in framing lumber, header thickness, or a sill-pan flashing results in walls thicker than the jamb width, I often make the casing fit better around doors and windows with “the beating of the rock.” Typical jamb stock is 1⁄16 in. wider than the wall it’s intended for, but that’s often not enough, so I flatten the drywall immediately surrounding the jambs with a hammer. I score the drywall with a utility knife near the center of where the casing will be and then beat the edge surrounding the opening, smashing down the drywall so it better matches the jamb width. Scoring with a knife first helps the drywall fold into a consistent plane for the casing to follow.

FRONT BEVELING— When walls are more than 1⁄8 in. proud of the jamb, it helps to “front bevel” the casing so that there’s a slight gap at the front of the miter joint. Set the miter on the saw and tilt the casing up at the back of the fence with a shim to match how the casing will sit on the opening. Visualizing how the casing will fit on the opening helps you properly orient the casing at the saw, so that when the casing is installed it matches the wall conditions, creating a tight miter. Make sure that the shims are held firmly under the casing and are fully supported by the saw’s fence as a backstop.
JAMB EXTENSIONS— When walls are 1⁄4 in. or more proud of the jambs, add jamb extensions to bring the jambs into plane. Measure how much the jamb is short of the drywall with a combination square. If the gap is a consistent width (within 1⁄16 in.), I rip an extension of uniform width. If the width varies by more than 1⁄16 in., I make a tapered extension with a track saw.

MINIMIZE MITERS
ADD A BACK BAND— Butt joints hide seasonal movement and are more likely to stay closed than mitered joints, especially if the joint is strengthened with tenons, biscuits, or pocket screws. Without the miter, the wood casing can expand and contract with changes in temperature and humidity without pushing apart the joint. Back bands are a way to dress up and hide the end grain of butt-jointed casing using a mitered joint. The back band can be a molding made for this application or an outside corner molding. Because of their geometry, outside corner moldings have an advantage. One of their legs is flat sawn and one leg has vertical grain typical of quarter-sawn stock. Use the vertical grain on the face of the casing and wood can expand and contract without opening the mitered corners. Check the grain orientation before cutting and make the back band a few hundredths of an inch longer than the casing. This small space between the backband and casing allows for seasonal movement.

USE JACK MITERS— Jack miters are another hybrid casing option that combine a butt joint and a small miter at a profiled part of the same molding. The butt joint allows the head and leg casing to move independently while the joint stays closed in comparison to a regular miter joint. For further stability of the butted part of the casing, you can join the two pieces on the back side with pocket-hole screws.
 From Fine Homebuilding #314
To view the entire article, please click the View PDF button below.
Brian Campbell is a master carpenter for TreHus (trehus.biz) in Minneapolis, Minn. Drawings by George Retseck.
RELATED STORIES

View Comments
Gotta love these illustrations. Clear, plentiful and lovingly hand drawn (or maybe using a CAD system). John Muir, author of "How to Keep your VW (Beetle) Alive," pointed out that drawings are often much better than photos, because they can focus on what's important and not distract you with irrelevant background. These drawings exemplify that concept.
P.S.
A bit of Googling took me to George Retseck's site, http://george-retseck.squarespace.com/