Templating Countertops
How to prepare and what to expect when ordering stone, composite, and solid surface countertops
Countertops are exciting. They double as a workhorse and showpiece in our kitchens. And, countertop installation often signals the final stages of a kitchen remodel. If you want to make and install your own countertops, there are some good options.
Wood counters are familiar to most builders and add warmth and character to a kitchen. Laminate counters are affordable and the process is approachable for anyone with basic carpentry skills and tools. And concrete counters offer endless design potential and a modern look. Other materials, however, are best left to the pros.
That doesn’t mean that you shouldn’t be informed about what it takes to order and template for granite, marble, stone composite, and solid surface counters. In fact, it is imperative that you are informed so that you are ready when the installer arrives to measure and template, and your work on the cabinets is an acceptable surface to mount the countertops.
Templates ensure accuracy
Templates, constructed from strips glued together into a lattice, are an accurate way to transfer spatial measurements to any sheet material or flat surface, whether it’s a piece of drywall that needs to be notched beneath open-ended stairs or a new door that must be fit to an old, out-of-square door frame. Templates are a cheap and largely foolproof way to assemble and transfer myriad measurements.
Templates are essential to countertop installations, where finish materials can cost thousands of dollars. Templates are typically made by the supplier (the company fabricating the countertop), so consequently, company reps take great pains to get the template right, because if they goof, the company eats the cost.
Here’s an overview of ordering countertops and creating templates.
Preliminaries
Ordering countertops starts with a floor plan, drawing, or sketch that goes out to bid. The bid should specify a completion date, terms of payment, and the scope of the installation. In most cases, quoted prices will not include plumbing, electrical work, or adjustments to the cabinets such as sink cutouts and leveling plywood substrates.
Scheduling
Most installations require two visits from the countertop supplier: the “measure date” and the “install date.” It’s difficult to pinpoint a measure date until the cabinets are installed, but in general, two weeks’ to four weeks’ notice should be enough. Typically, solid-surface (such as Corian®) and plastic-laminate countertops require about one week between the measure date and the install date. Quartz-composite countertops (such as Zodiaq®) require about two weeks. Most suppliers will allow you to change installation dates without penalty, provided you give them enough notice.
The measure date is the last chance to give input on details such as underlayment issues, color, edge treatment, and splash detail. Whatever you finally decide on, get it in writing. During this meeting, the supplier will review job site conditions, so the general contractor should be there, too.
Important prerequisites
1. Cabinets must be set before the job can be measured. In other words, the cabinets must be screwed together and screwed to the walls, not just pushed into place. The cabinets cannot be moved even 1⁄8 in. after the countertop supplier has measured because countertops are fabricated to close tolerances.
2. Cabinets must be set level. As general rule, the plane of the cabinet top(s) must be level within 1⁄8 in. over a 10-ft. length. Such stringent requirements are a concern not only to installers but also, in some cases, to manufacturers as a condition of warranty.
3. All appliances and sinks should be on the job site at the time of the measure. The fitting of sinks and appliances is often critically close. Design or construction issues that could cause problems or delay the installation should be resolved on the measure date. If the sinks and appliances are on site, the supplier can inspect them. If there’s a defect, damage, or, say, a sink rim that won’t fit the countertop, you’ll need time to replace the item before installation.
Template materials
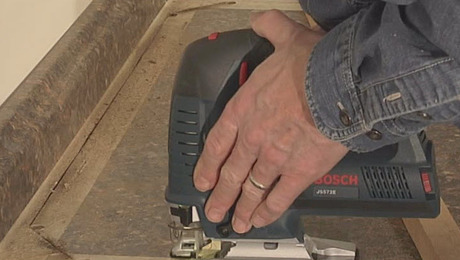
Templates are most often made by hot-gluing strips of 1⁄8-in.-thick plywood (also called doorskin), which is rigid enough to keep its shape yet light to transport and position on counter stock. Primarily used to face hollow-core doors, doorskin can be cut into strips by a fine-tooth table saw blade, or by a utility knife drawn along a straightedge. Doorskin is widely used because it is cheap (about $10 for a 4 ft. x 8 ft. sheet), glues quickly and holds its template shape well. Write measurements right on the wood. The knock on doorskin templates is that you need a truck to transport them–assembled, they are too large and stiff to be rolled up.
As an alternative, you can buy plastic templating strips that also glue together, but are flexible enough to roll up. Plastic strips require quick-drying solvent glues (usually PVC); low-VOC adhesives are available. This option tends to be more expensive than doorskin. TemplatePro® offers a kit of 40 pre-cut strips (0.04 in. thick x 2 1/4 in. wide x 96 in. long) and a can of glue for about $65. You can write on strips using a permanent marker; if you want to reuse the strips, erase the writing with de-natured alcohol. A utility knife cuts strips. An alternative supplier, Templast, sells 48 in. x 96 in. sheets of corrugated plastic for about $12 each, but the rub is that you have to buy a skid of 100 sheets, which weighs about 200 lbs. and costs roughly $1250.
What details to note on a template
What details you write on the assembled template will vary according to the countertop material and the fabricator’s preferences. Cutouts for faucet holes, for example, will be manufactured into a Silestone® countertop, whereas granite counter installers typically drill such openings after the counter is installed to avoid transporting a slab weakned by holes. In general, the more details, the better.
1. Installers typically start by placing a long template strip along the wall behind the cabinet and another along the front edge. The first thing to note is if the wall is straight; and if not, note irregularities on the template. Measure to see if the wall is parallel to the front of the counter top and, if there are end walls, use a square to see if they are perpendicular. Fabricators will recommend gaps between counter tops and walls (say, 1/4 in.) but it’s important that the template exactly record existing irregularities.
2. Edge notations should include the amount of overhang, edge thickness and edge detailing–i.e. a half-round edge. Note all polished (exposed) edges, including, say, the cutout for an under-mounted sink.
3. When measuring for a backsplash, note its length and height and interruptions such as window openings, cooktop edges and so on. Note also receptacles and switches that will be placed in the backsplash.
4. After locating large cutouts for sinks, cooktops and the like, label whether the item is to be top-mounted or under-mounted. Locate the center of each cutout by measuring out from a joint or edge at two locations on the template. For all cutouts–including smaller ones for faucets, drain pipes, etc., leave sufficient space between the cutout and the back edge, allowing extra space if there will be a backspace.
This overview of countertops and templates is adapted from Renovation 4th Edition, which contains thousands of field-tested tips and techniques. Brand new from Taunton Press, Renovation 4th Edition‘s 614 pages include 250+ technical drawings and 1,000 photos selected from the 40,000 that I have taken over the years. I hope you find it useful. -Mike
© Michael Litchfield 2013
Fine Homebuilding Recommended Products
Fine Homebuilding receives a commission for items purchased through links on this site, including Amazon Associates and other affiliate advertising programs.
Musings of an Energy Nerd: Toward an Energy-Efficient Home
Code Check 10th Edition: An Illustrated Guide to Building a Safe House
Get Your House Right: Architectural Elements to Use & Avoid
-
Templates are typically made by hot-gluing strips of 1⁄8-in.-thick plywood (also called doorskin), which is rigid enough to keep its shape yet light to transport and position on counter stock.
-
The more complex the site conditions or cutouts, the more information the template contains. This small section notes the type of granite, edge bevels, edge thickness and the location of the sink cutout. The template's back edge registers to the window width.
-
Renovation 4th Edition contains lifetimes of experience: thousands of field-tested tips and techniques that master builders across North America shared with Mike Litchfield, a founding editor of Fine Homebuilding.


View Comments
Another alternative to the above mentioned template materials is to use strips of fresh corrugated cardboard. (note: "fresh" means brand new sheets purchased for the sole intension of making templates. Just because that refrigerator is new doesn't mean the cardboard box it came in is "fresh")
Cardboard is sold in 4'x8' sheets that cost less and weigh less than any plywood or plastic material. I get mine from the same sheet goods supplier that I get my cabinet grade plywoods from {AllAmericanPlywood; Detroit}.
Just like doorskin, cardboard can be ripped into strips on the table saw and onsite it can also be hot glued together. Obviously you can write on it using pencil, pen, marker, crayon if you like. The main difference is that to cut and scribe the cardboard all you need is a utility knife. Then to transport the cardboard you just fold it up and toss it in the back seat. Back at the shop it unfolds very accurately.
There are only two drawbacks to cardboard; it doesn't like water (duh) so don't transport it in the bed of your truck during a rainstorm. Secondly, it doesn't last forever. Cardboard templates are sort of a one-time deal so if you are making a template that needs to be recreated over and over [like a common sink template] better to make that out of plywood.
Even if you only casually template countertops, you will eventually run into that largish 12'x12' L-shaped or U-shaped kitchen. Then you'll understand what I mean about the benefits of a light weight fold-up cardboard countertop template.
DC
We have used this technique in yacht carpentry since I can remember, and I'm old. On yachts, it seems everything is curved and forget a level!
Depending on the size of the project, I like one-inch strips for smaller and 1-1/2-inch strips for larger templates. Hot glue holds it all together quite nicely.
Your favourite planes and sanders can be used to form curves. SurForm planes work well.
Flexible curves, such as the Alvin Tru-Flex are great for copying a curve. Old naval architect trick.
I would hope that all trim carpenters would use this trick as well to ensure neat fits.
@CapnJohn
Yachts you say? Then you must have and use some form of a "jigger stick".
The old ca'penta' that taught me trim used to have one... essentially it just looks like a giant jabsaw blade cut out of 1/8" sheet aluminum. We'd cut a sheet of cardboard or plywood to fit close enough then lay the jigger on the sheet, stick the tip of it on whatever point we needed to reference then trace the jigger teeth.
Later in the shop we could re-align the teeth with the tracings and mark the point on the work piece then come back through to fair the curves with a "bending stick" (a simple shop made adjustable curve that looks & works like a long bow; made from a thin strip of white oak and a string).
The system worked amazingly well by itself if not only to generate another, much closer template that can be scribed in the conventional manner.
"Perfect is close enough" and we'd fake to other tradesmen that we never used such techniques let alone even knew of the existence of products like 'caulk' and 'filler putty'. "Filler? Hmm, never heard of it. Sounds like it could work though. Nope, I just guessed a line and cut it. Must've gotten lucky again." It was always fun to see the look on peoples faces when you convince them that you're just a dumb carpenter that somehow seems to get lucky every time.
DC